
This chapter outlines how to move the PeopleSync database to a different server.
You should not move the PeopleSync database to a SQL Server with a lesser version than the source SQL Server.
Moving the database
-
Close all running PeopleSync Consoles.
-
Set the startup type of the service PeopleSync Service to Disabled.
-
Restart the system.
-
Backup the PeopleSync database on the old SQL Server and restore the database on the new SQL Server as outlined in Microsoft KB article 314546 (http://support.microsoft.com/kb/314546/en ).
-
On the old SQL Server, create the necessary stored procedures sp_hexadecimal and sp_help_revlogin for transferring the PeopleSync logins by following step 1 of method 2 from Microsoft KB article 918992 (http://support.microsoft.com/kb/918992/en ).
-
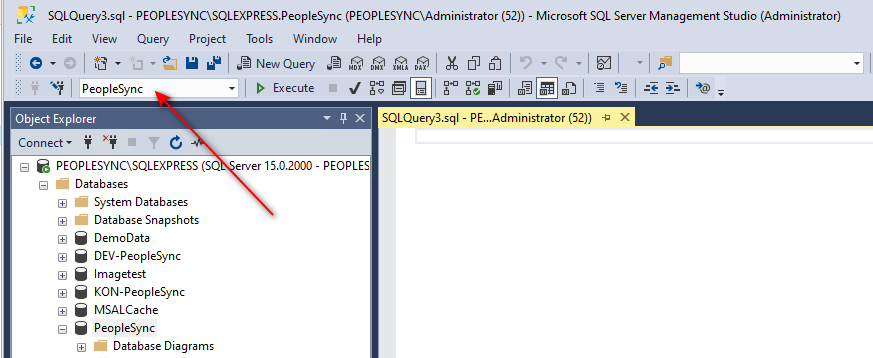
On the old SQL Server, in SQL Server Management Studio, switch to the PeopleSync Database:
-
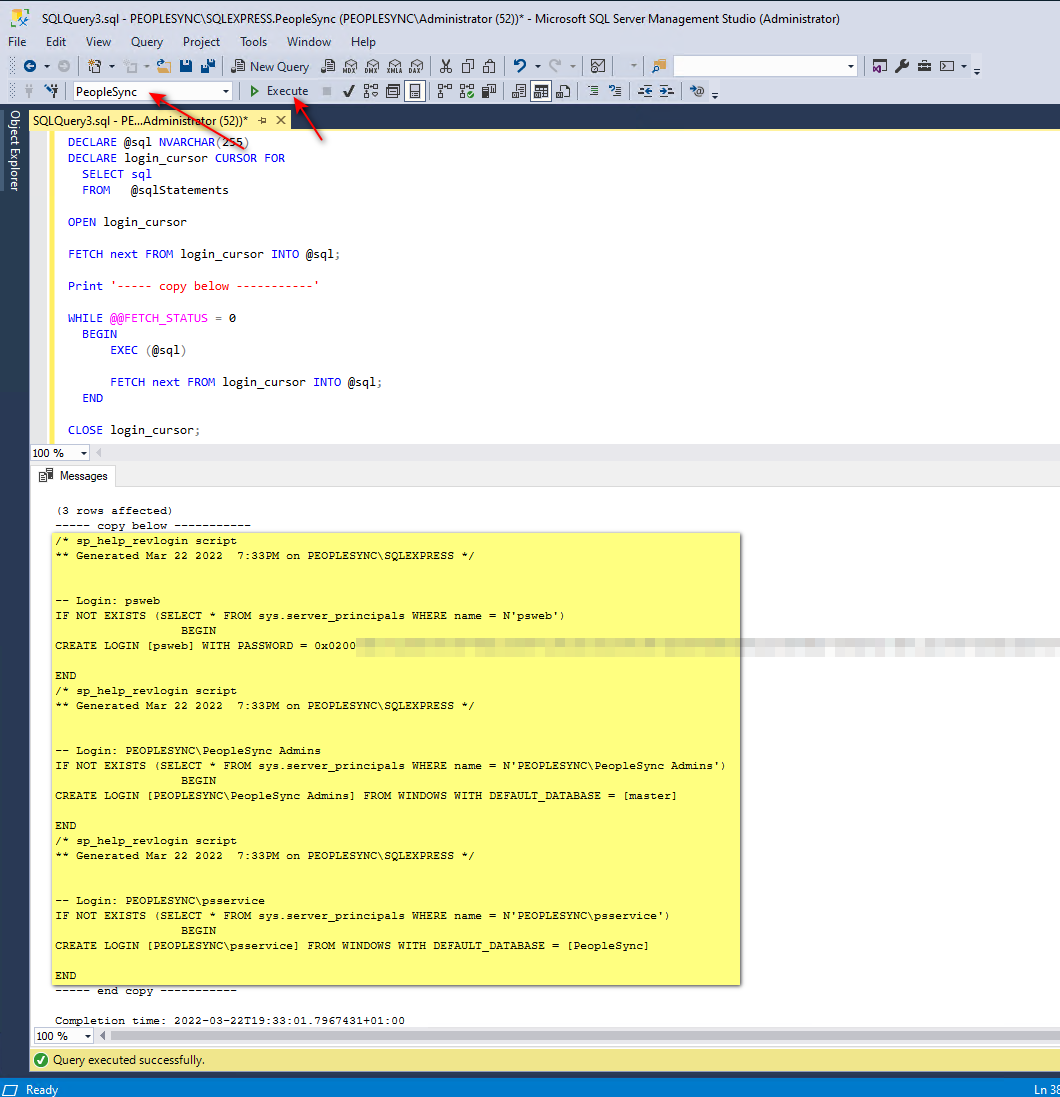
To create a script for re-creating the logins, run the following command in the query window:
SQLDECLARE @sqlStatements TABLE ( sql NVARCHAR(255) ) INSERT INTO @sqlStatements SELECT 'master..sp_help_revlogin ''' + lo.[name] + ''';' FROM sys.database_principals AS us JOIN sys.server_principals AS lo ON us.sid = lo.sid WHERE us.type IN ( 'S', 'U', 'G' ) AND NOT us.NAME = 'dbo' DECLARE @sql NVARCHAR(255) DECLARE login_cursor CURSOR FOR SELECT sql FROM @sqlStatements OPEN login_cursor FETCH next FROM login_cursor INTO @sql; Print '----- copy below -----------' WHILE @@FETCH_STATUS = 0 BEGIN EXEC (@sql) FETCH next FROM login_cursor INTO @sql; END CLOSE login_cursor; DEALLOCATE login_cursor; Print '----- end copy -----------'
-
In the Messages window, copy the output between the “copy below” and “end copy” lines to the clipboard.
-
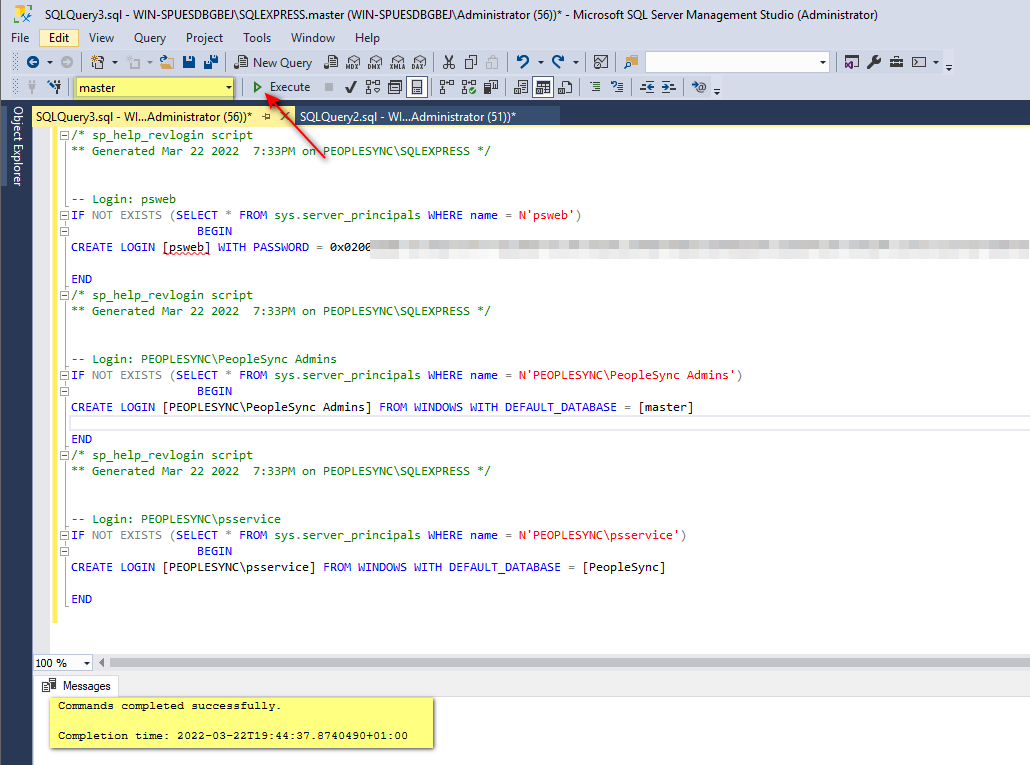
To recreate the logins on the new SQL Server, use SQL Server Management Studio to connect to the new SQL Server instance and run the script you copied before in a query window with Master database selected:
-
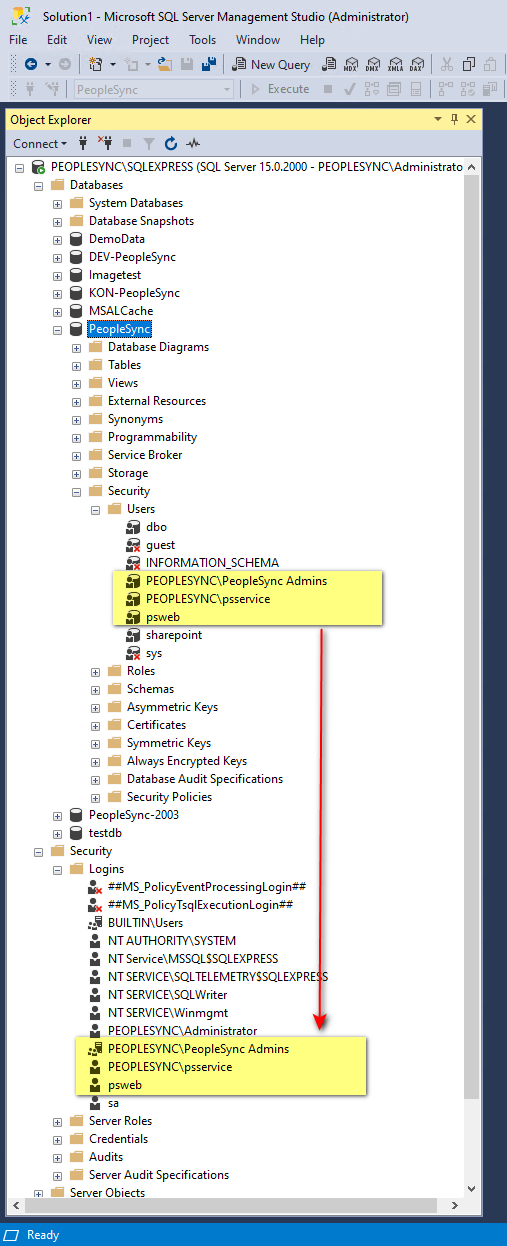
On the new Server, check that for each user in the PeopleSync database you have a corresponding login at the server level:
-
Open the properties of each login relevant to PeopleSync and make sure that they have at least db_datareader and db_datawriter permissions in the PeopleSync database. For reference, compare with the old database.
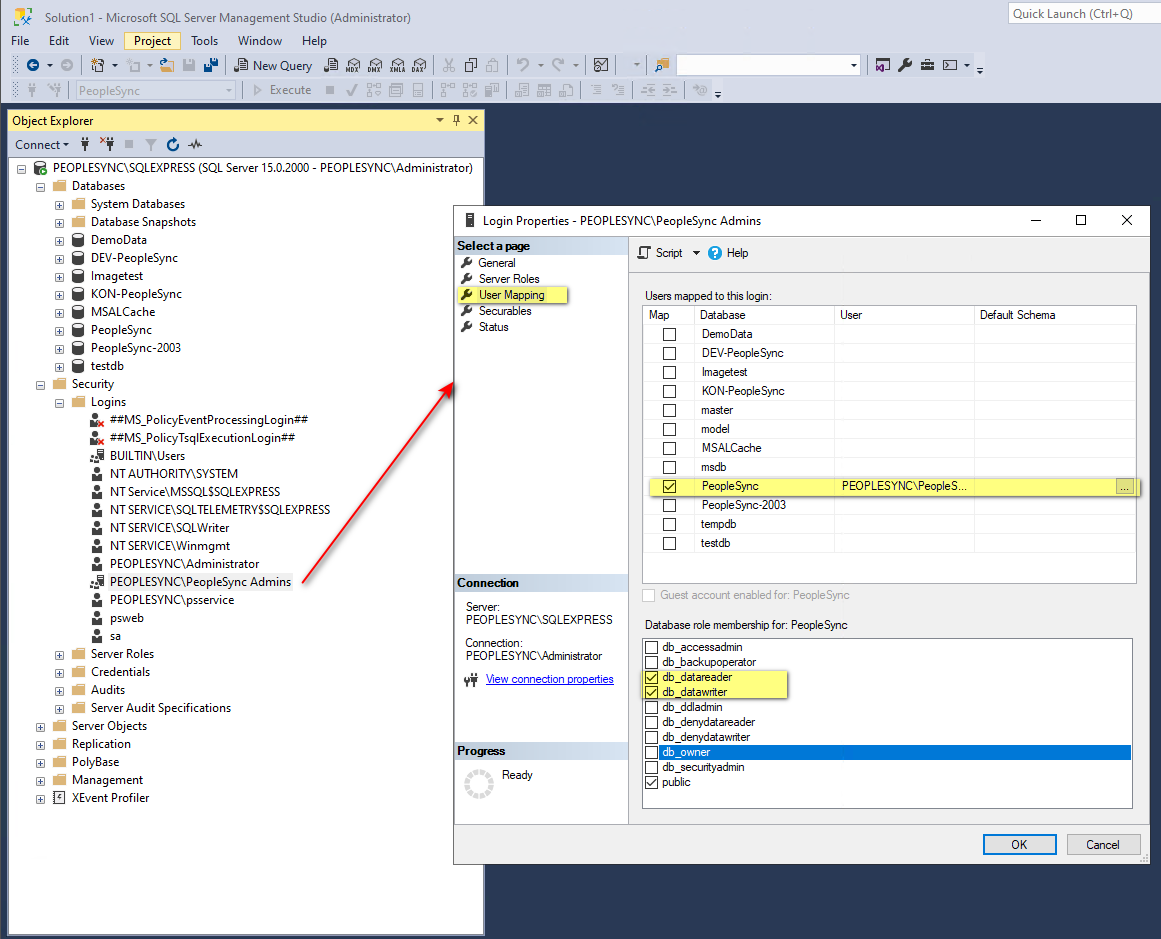
Users performing updates of PeopleSync must have db_owner permissions on the PeopleSync database.
-
Detach the PeopleSync database on the old SQL Server by right-clicking on the database in SQL Server Management Studio and selecting Tasks|Detach.
Configuring the PeopleSync Frontend Server
If the PeopleSync frontend server is not moving to a different server, please follow these steps to change the database connection to the new SQL Server:
-
Login to the PeopleSync Web server.
-
Run Notepad using Run as Administrator.
-
In File|Open, go to the PeopleSync Frontend installation directory, i.e. C:\Program Files\messageconcept GmbH\PeopleSync Server, then to the www subdirectory. Open the server.ini file.
-
Edit the db_host parameter to reflect the new server name.
-
Save server.ini and close Notepad.
Configuring the PeopleSync Backend (Version up to 23.1)
If the PeopleSync Console & Service are not moving to a different server, please follow these steps to change the database connection to the new SQL Server:
-
Login to the PeopleSync Service server.
-
Run Notepad using Run as Administrator.
-
In File|Open, go to the PeopleSync Agent installation directory, i.e. C:\Program Files\messageconcept GmbH\PeopleSync\Agent. Open the Agent.exe.config file.
-
Search for ConnectionString in the file. You should find an element such as:
<add name="ConnectionString" connectionString="Integrated Security=SSPI;Pooling=false; Data Source=srv-1;Initial Catalog=PeopleSync" />
Please note that “<add name=..” may not be preceded by “<!--“ -
Change the value in “Data Source” to reflect the new server name. For example:
<add name="ConnectionString" connectionString="Integrated Security=SSPI;Pooling=false;Data Source=newSQLServer;Initial Catalog=PeopleSync"/> -
Save agent.exe.config.
-
Repeat steps 13-16 with the WorkflowExecutor.exe.config file in the Workflow Executor directory, i.e. C:\Program Files\messageconcept\PeopleSync\Agent\wfx.
-
In File|Open, go to the PeopleSync Console installation directory, i.e. C:\Program Files\messageconcept GmbH\PeopleSync\Console. Open the PeopleSync.Console.exe.config file.
-
Repeat steps 4-6.
-
Close Notepad.
-
Repeat Steps 8-10 for each computer with a PeopleSync Console.
-
Login to the PeopleSync Service server.
-
Set the startup type of the service "PeopleSync Service" back to "Automatic" and start the service.
Configuring the PeopleSync Backend (Version 23.8 and newer)
If the PeopleSync Console & Service are not moving to a different server, please follow these steps to change the database connection to the new SQL Server:
-
Login to the PeopleSync Service server.
-
Run Notepad using Run as Administrator.
-
In File|Open, go to the PeopleSync Agent installation directory, i.e. C:\Program Files\messageconcept GmbH\PeopleSync\Agent. Open the Agent.dll.config file.
-
Search for ConnectionString in the file. You should find an element such as:
<add name="ConnectionString" connectionString="Integrated Security=SSPI;Pooling=false; Data Source=srv-1;Initial Catalog=PeopleSync" />
Please note that “<add name=..” may not be preceded by “<!--“ -
Change the value in “Data Source” to reflect the new server name. For example:
<add name="ConnectionString" connectionString="Integrated Security=SSPI;Pooling=false;Data Source=newSQLServer;Initial Catalog=PeopleSync"/> -
Save agent.exe.config.
-
Repeat steps 13-16 with the WorkflowExecutor.dll.config file in the Workflow Executor directory, i.e. C:\Program Files\messageconcept\PeopleSync\Agent\wfx.
-
In File|Open, go to the PeopleSync Console installation directory, i.e. C:\Program Files\messageconcept GmbH\PeopleSync\Console. Open the PeopleSync.Console.dll.config file.
-
Repeat steps 4-6.
-
Close Notepad.
-
Repeat Steps 8-10 for each computer with a PeopleSync Console.
-
Login to the PeopleSync Service server.
-
Set the startup type of the service "PeopleSync Service" back to "Automatic" and start the service.