
Introduction
Apart from a CardDAV interface, which is provided by the PeopleSync Frontend Server, there is also the possibility for clients to query PeopleSync address lists via LDAP. To this end, PeopleSync provides an LDAP directory based on Microsoft Active Directory Lightweight Directory Services (AD LDS).
This guide gives an overview about the PeopleSync LDAP directory and shows how to configure LDAP clients to use the directory.
Note: Installation and configuration of the PeopleSync LDAP directory is described in the PeopleSync setup and configuration guide.
The PeopleSync LDAP Directory is a Microsoft AD LDS instance. For guidance on how to administer, backup and scale out the PeopleSync LDAP Directory, please consult the following Microsoft Technet documentation:
Technical Overview
In this chapter, we describe the configuration and internal structure of the PeopleSync LDAP directory as installed by the PeopleSync Instance Installer.
Address list lifecycle
The PeopleSync service manages address lists in the LDAP directory through a process called “LDAP Lifecycle”. This process is responsible for creating and deleting address lists, as well as setting permissions. The process runs every 10 minutes and processes configuration changes made to address lists.
When the Published LDAP attribute of an address list is set to “Published”, an organizational unit (OU) for the address list is created in the “Addresslists” OU. Also, read permissions configured on the address list’s LDAP Permission tab will be set. Once the address list has been created in LDAP, changes made to LDAP permissions in the console will be processed once the LDAP Lifecycle runs again.
When an address list is deleted or the Published LDAP attribute is set to “Not Published”, LDAP Lifecycle will delete the address list’s OU together with its contacts.
Contacts in LDAP address lists are managed by the agent configured for this address list.
If the address list is published in LDAP, the agent will publish contacts to the LDAP directory, as well as to the PeopleSync server. No further configuration is needed. Due to technical restrictions, pictures will not be published to the LDAP directory.
Instance properties
The PeopleSync LDAP directory is a Microsoft AD LDS instance. By default it listens on the following Ports:
-
LDAP: TCP Port 389
-
LDAPS: TCP Port 636 (only if SSL has been configured)
If LDAPS (LDAP over SSL) is needed, it can be configured by following the instructions outlined in the Microsoft Technet article “Appendix A: Configuring LDAP over SSL Requirements for AD LDS”.
Logical structure
The LDAP directory has one application partition named “DC=peoplesync,dc=local”.
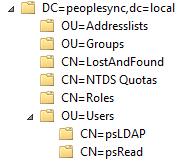
Apart from built-in containers created by AD LDS itself, there are several containers specific to PeopleSync:
-
Addresslists: PeopleSync address lists are located here by default. Peoplesync creates address lists as child OUs and manages address list lifecycle, as well as permissions by itself.
-
Groups: Empty by default. This is where PeopleSync-specific LDAP groups should be created. These groups can be used to assign read permission to specific address books in the PeopleSync console.
-
Users: Home to the the following default users:
-
psLDAP: Service account used by the PeopleSync service to manage address lists in the directory.
-
psRead: Account with read-only access to the directory. Can be used by clients, if users shall have access to all address lists.
-
User and Group Management
Users wanting to search the PeopleSync LDAP directory can either log in with the built-in psRead@PeopleSync.local account, which has access to all address lists in the PeopleSync LDAP directory, or with a user-specific Active Directory or LDAP account.
Individual accounts by default don’t have access to address lists. They need to be member of a group from the PeopleSync LDAP directory which has been granted access to an address list via the PeopleSync console.
If the server running the PeopleSync LDAP directory is located in the same domain as the users, Active Directory accounts can be used. If the server is not in the same domain or you don’t want to use Active Directory accounts for authentication, you can create accounts in the PeopleSync LDAP directory itself. In any case, these accounts must be added to a group in the PeopleSync LDAP directory.
Users and groups in the PeopleSync LDAP directory can be managed by using ADSI Edit or other LDAP directory administration tools. In the following sections, we explain how to manage users and groups in the PeopleSync LDAP directory.
Connecting to the PeopleSync LDAP Directory
The PeopleSync LDAP directory is a Microsoft AD LDS instance. To connect to the directory, you can use ADSI Edit:
-
Log in to the server on which the PeopleSync LDAP directory is installed with an account that is a member of the local administators group.
-
In the Start Menu, go to Administrative Tools and run ADSI Edit.
-
Right Click on the ADSI Edit node and select Connect to…
-
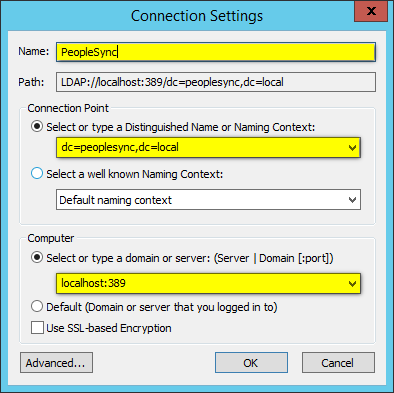
Enter Name, Distinguished Name and Computer. The distinguished Name should be “dc=PeopleSync,dc=local”, the Computer name: “localhost:389”:
-
After entering the connection information, click OK.
-
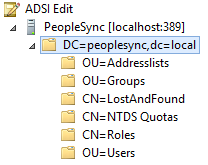
You can now see the LDAP directory by expanding the tree on the left-hand side of the console.
Managing Users
In this section, we will show how to manage users in the PeopleSync LDAP directory. This is only necessary if it is not possible to use Active Directory users from the server’s domain for authentication.
Creating a user
To create a user in the PeopleSync LDAP directory, please do the following:
-
Connect to the directory via ADSI Edit as described in 3.1 Connecting to the PeopleSync LDAP Directory.
-
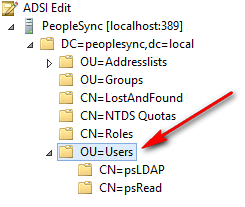
In the console tree, navigate to the Users OU.
-
Right-click on the Users OU, select New|Object.
-
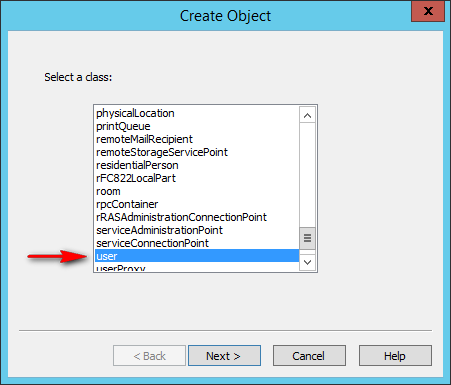
For class, select “user”, then click Next.
-
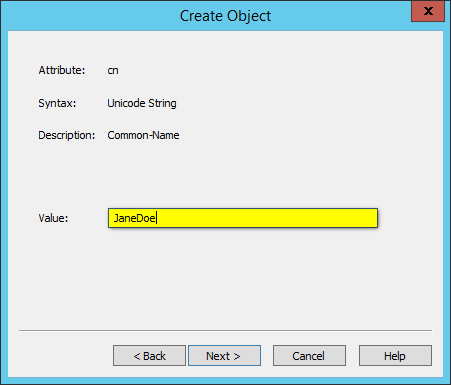
In Value, enter the user’s CN, e.g. “JaneDoe”, then click Next.
-
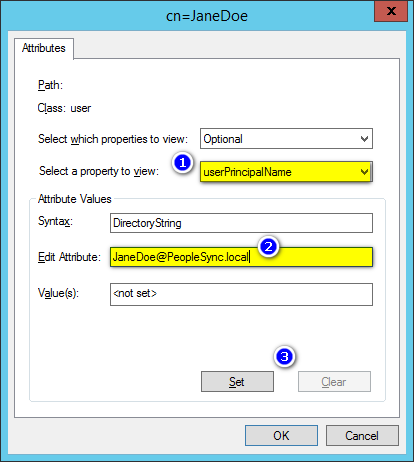
Click on More Attributes.
-
In Select a propery to view, choose “userPrincipalName”. In Value, enter the user’s user principal name as <CN>@PeopleSync.Local.
Finally, click Set.
-
Click OK, then Finish.
-
Right-click the user you just created and set the password via Reset Password…
Please note that you can either use the user’s distinguished name or user principal name to connect to the directory. For convenience, use the user principal name.
Changing a user’s password
To change a user’s password in the PeopleSync LDAP directory, please do the following:
-
Connect to the directory via ADSI Edit as described in 3.1 Connecting to the PeopleSync LDAP Directory.
-
Right-click the user and set the password via Reset Password….
Deleting a user
To delete a user in the PeopleSync LDAP directory, please do the following:
-
Connect to the directory via ADSI Edit as described in 3.1 Connecting to the PeopleSync LDAP Directory.
-
Right-click the user and select Delete.
Managing Groups
You need to use groups in the PeopleSync LDAP directory to grant access to address lists, should you choose not to use the default psRead@PeopleSync.local account.
Creating a Group
To create a group in the PeopleSync LDAP directory, please do the following:
-
Connect to the directory via ADSI Edit as described in 3.1 Connecting to the PeopleSync LDAP Directory.
-
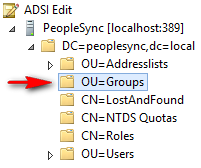
In the console tree, navigate to the Groups OU.
-
Right-click on the Groups OU, select New|Object.
-
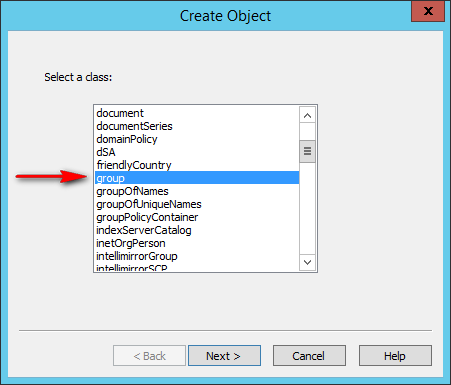
For class, select “group”, then click Next.
-
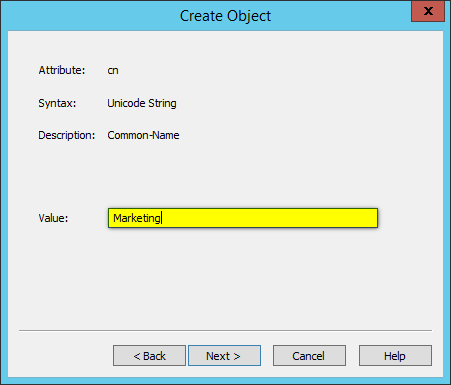
In Value, enter the group’s CN, e.g. “Marketing”, then click Next.
-
Click Finish.
Managing a Group’s Members
Both LDAP users and Active Directory users can be added to a group. To add a member to a group, follow these steps:
-
Connect to the directory via ADSI Edit as described in 3.1 Connecting to the PeopleSync LDAP Directory.
-
In the console tree, navigate to the Groups OU.
-
Right-Click on the group and select Properties.
-
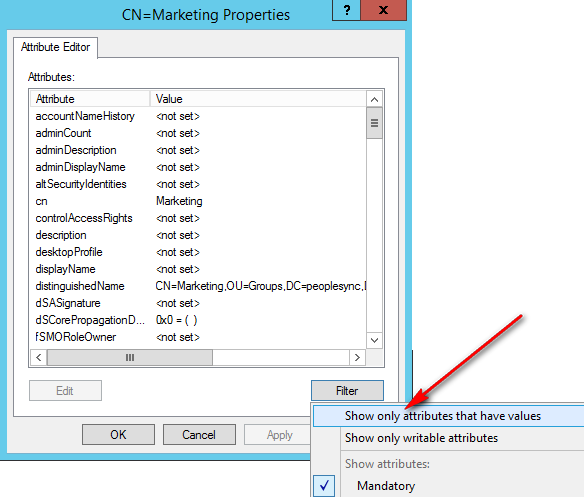
Click on Filter and deselect Show only attributes that have values.
-
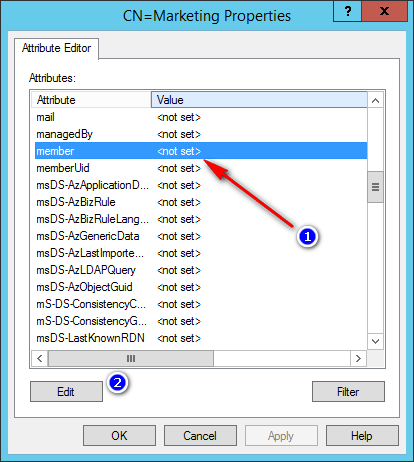
In the list, select the member attribute and click Edit.
-
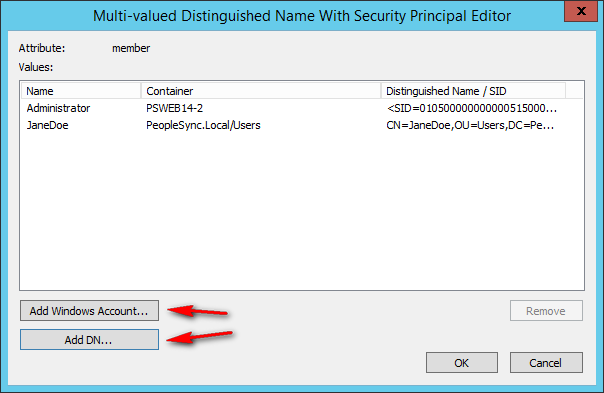
Add members to the group by adding them with the Add Windows Account or Add DN buttons. You can also remove group members by selecting a group and clicking on Remove.
-
After you have finished, click OK to close the window. Then click OK to save changes to the group.
Client configuration
LDAP interfaces can be found in a variety of devices and applications. In contrast to CardDAV, LDAP is normally used to search a directory, not to provide a copy of an address book for offline use.
In this section, we provide a generic sample configuration, as well as sample configurations for Outlook and Cisco SPA525G2 phones.
Generic Configuration
In general, the following information must be provided for an application or device to use the LDAP server:
-
Username: The username. Can be specified as user principal name (UPN) or distinguished name.
-
Password: The password.
-
Server name: DNS Name or IP of LDAP Server.
-
Search Base: The distinquishedName of the starting point for the search, i.e. ou=addresslists,dc=peoplesync,dc=local
Depending on the client, a search filter and/or display attributes may need to be configured. These are common attributes to use in filters and display values:
-
Display name: displayName
-
Last name: sn
-
First name: givenName
-
Company: company
-
Department: department
-
Telephone: telephoneNumber
-
Mobile: mobile
-
Home phone: homePhone
Outlook Configuration
The following configuration can be used for Outlook 2010 and Outlook 2013.
-
Launch Outlook
-
Click on File tab.
-
Click on Account Settings | Add and remove accounts…,
-
Go to the Address Books tab.
-
Click New….
-
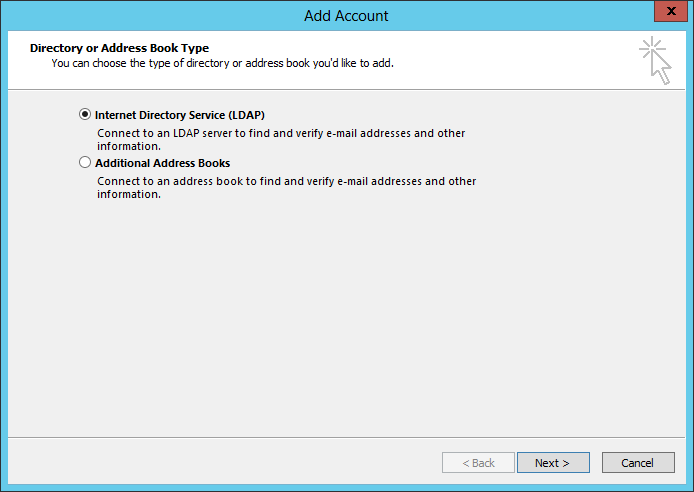
Choose Internet Directory Service (LDAP)
-
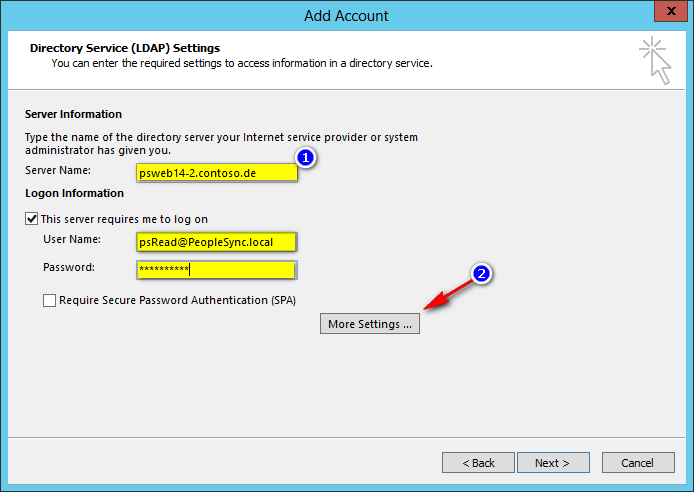
Fill in the server name (i.e. name of the server where the PeopleSync AD LDS instance is installed), as well as user name and password. As user name, either use the default psRead@PeopleSync.local account or an account with permission to connect to the directory.
Then click on More Settings.
-
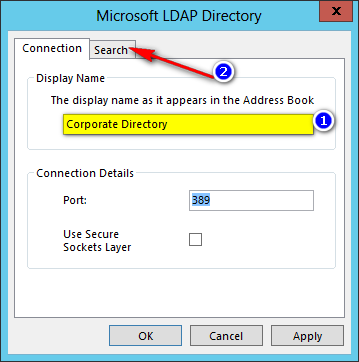
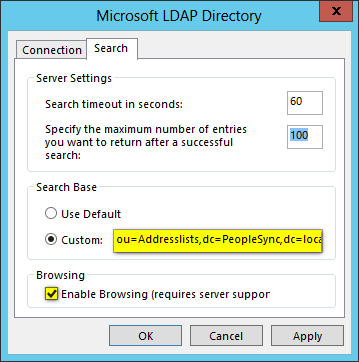
Change the address book's display name to something meaningful, then click on the Search tab.
-
Change the search base to "OU=Addresslists,dc=PeopleSync,dc=local" and select Enable Browsing for users to see the address list's contents in Outlook.
-
Click OK and finish the configuration wizard.
-
Restart Outlook in order for changes to take effect.
Cisco SPA525G2 Configuration
The Cisco SPA525G2 is a Voice-over-IP business phone that supports looking up contacts in an LDAP directory. LDAP-capable phones from other vendors may have slightly different configuration options, but can broadly be configured in a similar way. For information on how to configure other models, please contact your phone manufacturer.
-
Log in to the phone's web GUI as an administrator.
-
Switch to Advanced view.
-
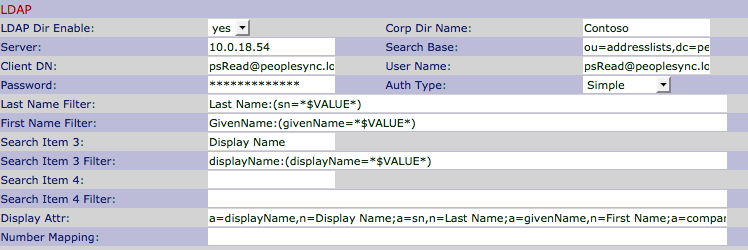
Click on the Phone tab an scroll down to the LDAP section.
-
Configure the properties described later in this section and click Submit all Changes.
For LDAP directory search to work, the following properties need to be set:
LDAP Dir Enable: yes
Corp Dir Name: Display name for the LDAP directory
Server: DNS name or IP address of LDAP server
Search Base: The point from which the phone shall search in the LDAP directory, i.e. "OU=Addresslists,dc=PeopleSync,dc=local"
Client DN: UPN or distinguished name of user account used to connect. "psRead@PeopleSync.Local", if default read-only account is being used.
User Name: Same as Client DN.
Password: The user's password.
Auth Type: Simple, if authentication is performed via LDAP simple bind.
Last Name Filter: Filter for searching for a contact's last name.
Last Name:(sn=*$VALUE*)
First Name Filter: Filter for searching for a contact's first name.
GivenName:(givenName=*$VALUE*)
Search Item 3: Optional. Name of third search field.
Search Item 3 Filter: Optional. Filter for third search field.
displayName:(displayName=*$VALUE*)
Display Attr: Attributes to display in contact returned contacts. Entries are separated by ";" and have the form a=<ldapAtt>,n=<label>, where <ldapAtt> is the name of an LDAP attribute and <label> the description of the field to be shown on the phone.
a=displayName,n=Display Name;
a=sn,n=Last Name;
a=givenName,n=First Name;
a=company,n=Company;a=department,n=Department;
a=telephoneNumber,n=Phone,t=p;
a=mobile,n=Mobile;a=homePhone,n=Home;
For more information on how to configure your phone, please consult the phone's documentation provided by the manufacturer.